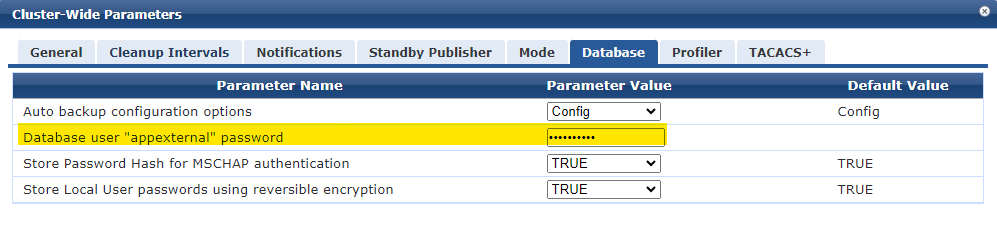
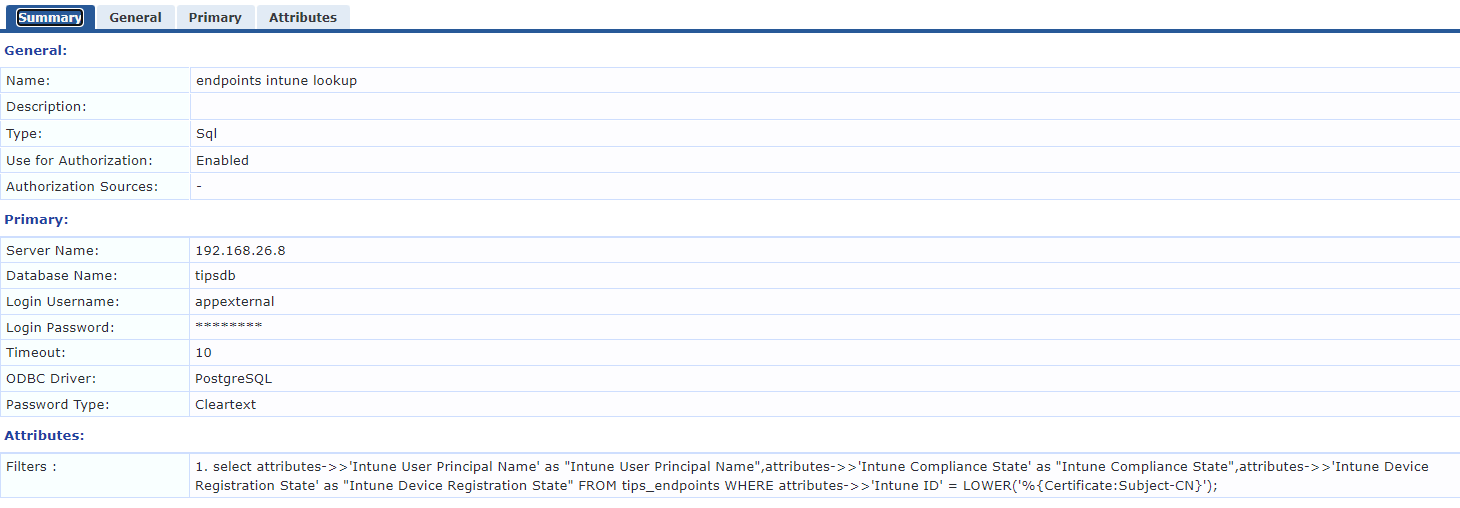
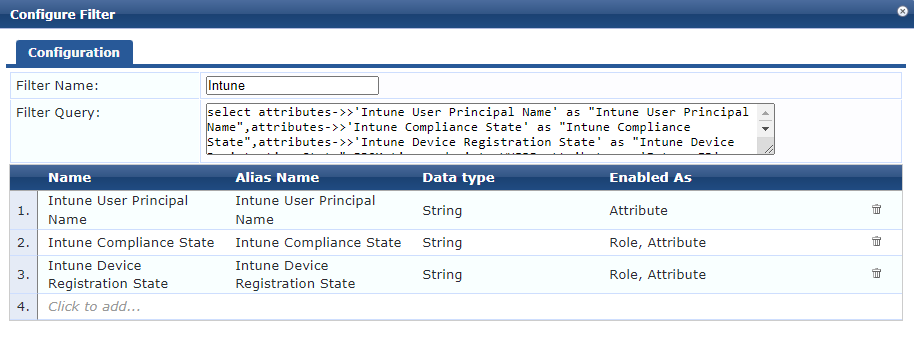
ClearPass, Intune and MAC randomisation

As more organisations have moved to Microsoft Azure AD and Intune to manage their devices a common request is how to integrate this with Aruba ClearPass, which handles the RADIUS requests for Network Access Control. The most common deployment pushes certificates to the clients which use these for EAP-TLS authentication with ClearPass. Note this post doesn’t cover the basic Intune integration setup which is documented in an Aruba guide.

But you probably want to know whether a bit more about the client than whether it has a valid certificate, so ClearPass has an Intune extension which will download information from an Azure tenant’s Intune to the Endpoints Repository database.

This allows you to make policy decisions based on Intune attributes, such as compliance state, allowing you to place clients in different roles/vlans depending on what the client is, whether it’s compliance with policy, department, etc etc.

However… the Endpoints Repository uses MAC addresses so problems start if clients are using MAC randomisation. The MAC address presented by the client won’t match what’s recorded by Intune so it won’t be possible to match against Intune attributes in the Endpoint.

The first thing to do is stop using the MAC address as the UID. Much better to use the Intune ID and have this written into the client certificate, either as the CN or a SAN though you can use any variable that ends up computed from the authentication.

You can then either query Intune directly using the Intune Extension HTTP method or use the Endpoints Repository in a slightly different way.

I prefer the latter option most of the time because it provides a level of resilience as well as improving performance. Querying the Intune API via the extension works very well but if Intune is down (which has been known to happen) that won’t work. It will also take longer than querying a local database.

ClearPass assumes you’re using the presented MAC address as the UID of the Endpoint and it isn’t possible to change this. Instead you can query Endpoints as an SQL database with a filter that pulls out the attributes you require based on the presented certificate CN.

ClearPass databases can be accessed externally using the username ‘appexternal’ and the password which is set in cluster-wide parameters under the Database tab.

Next create a new Generic SQL DB Authentication source pointing to the local tipsdb and set a filter that pulls out the attributes you want for the auth session variable presented.

Server name: <server IP>
Databse Name: tipsdb
Username: appexternal
Password: <password you set>
ODBC Driver: PostgreSQL
Password Type: Cleartext

A few things to note here. You can’t use localhost as the server name. If you have a VRRP address you can use this, otherwise you must use the actual IP of the server. This can cause complications in an environment with multiple ClearPass servers and no VRRP. There are ways around this but that’s for another blog.

The filter is the SQL query that pulls out the attributes you want based on an attribute presented. In this case we’re selecting ‘Intune User Principle Name’, ‘Intune Compliance State’ and ‘Intune Device Registration State’ for a record where the ‘Intune ID’ matches Subject-CN of the client certificate

select attributes->>'Intune User Principal Name' as "Intune User Principal Name",attributes->>'Intune Compliance State' as "Intune Compliance State",attributes->>'Intune Device Registration State' as "Intune Device Registration State" FROM tips_endpoints WHERE attributes->>'Intune ID' = LOWER('%{Certificate:Subject-CN}');

You then specify for each of these how you want the system to use the data it gets back, essentially either as an attribute or directly set as a role.

Add your custom authentication source into the service, and you’re good to go. You will now be able to make policy decisions based on the Intune ID lookup rather than the MAC address.

Three more things to note about this.

If you’re limited as to what can go into the certificate CN or SAN you can use the same method to pull out other details, for example with a query like this:

select attributes->>'Intune User Principal Name' as "Intune User Principal Name",attributes->>'Intune Compliance State' as "Intune Compliance State",attributes->>'Intune Device Registration State' as "Intune Device Registration State" FROM tips_endpoints WHERE attributes->>'Intune Device Name' = '%{Authentication:Full-Username}';

This method requires the device to be in downloaded to Endpoints by the Intune Extension. If that doesn’t happen it won’t be there to match on. In some circumstances Intune no longer records MAC addresses for devices – notably self-registered personal Android devices – and because the Endpoints Repository is based around MAC address these devices will be missing.

This is one of the reasons it’s worth using the Intune ID as your device’s UID in the certificate – if you need to query the Intune extension via HTTP you’ll need to present it with the Intune ID, nothing else will work. It’s worth noting devices will also have an Azure AD ID which looks similar, and will likely be the same for devices not managed by Azure AD, but the Intune API only understands the Intune ID when querying for device attributes.

Yet another Ser2Net tutorial

I often spend time away from home and want to be able to reach my home lab, both hardware and virtual. I use a Wireguard VPN, running within Home Assistant on a RPi 3 for the remote access, which means the network side is sorted. However I often find I’m juggling a few projects and might need to rebuild a hardware controller or an AP… that essentially needs console access. Whilst I could use a dedicated DC style console server they’re expensive, awkward, and overkill so I use Ser2Net on another RPi. There are plenty of tutorials on how to setup Ser2Net which are probably better than this one, but everything I found is based on an older version. Since then the config has changed to YAML and I found the defaults didn’t behave as I expected… so here we are.

Ser2Net “provides a way for a user to connect from a network connection to a serial port” – so says the project author Corey Minyard. You define a TTY interface and how you would like to connect to it. By default Ser2Net forwards raw data over TCP via a specified port to and from the TTY interface. Again, by default, you can only access a TTY over the network from localhost.

I threw my console server together using the latest version of Ubuntu for Raspberry Pi, Ubuntu 23.04 at the time of writing, running on a Pi 2b. Any old RPi is a good choice for the low power consumption and very light requirements.

Ubuntu 23.04 repositories contain ser2net version 4.3.11 which differs from previous version in that it uses YAML for the config. This is found in /etc/ser2net.yaml.

I’ve used three different types of USB Console – a couple of cheap FTDI cables from Amazon, USB console interface on an Aruba 7005 controller, and the Aruba TTL to serial cable for an AP. All were recognised by the OS.

How to set it up:

Build your Pi (or whatever machine you’re using) with Ubuntu 23.04 (or later)
Run sudo apt update && upgrade (just because we always should)
Install ser2net with apt install ser2net
Connect the USB serial interfaces and issue the command: sudo dmesg | grep ttyUSB
This will show you the USB to serial interfaces that have been recognised by the OS. It will look something like this:

You can now add these connections to the YAML file.

A quick note on security. Ser2Net doesn’t have any authentication. You can restrict the listener to localhost, as distinct from the host IP, and that means everything is protected by the strength of your ser2net host logon. I just want a telnet port forwarded to the TTY so it’s easy. This is not a good idea for any production environment without having other layers of security. In this case it’s a lab, and it’s only accessible either in person or via my VPN… so it’s good enough for me, but might not be for you.

The YAML for my console interfaces looks like this:

connection: &con0096
    accepter: telnet,192.168.26.3,2000
    enable: on
    options:
      banner: *banner
      kickolduser: true
      telnet-brk-on-sync: true
    connector: serialdev,
              /dev/ttyUSB0,
              9600n81,local
 

You need to increment the connection number, the port (2000 in this example) and the connector (/dev/ttyUSB0) in this example. If you have duplicates it won’t work properly though I believe you can use the same device in multiple connections to allow different port settings. The IP address of the accepter is where it listens for a connection. The default config has this set to tcp,localhost,xxxx which passes raw data over TCP (use something like nc) and is only available from the local machine. It probably goes without saying, but I’ll say it anyway, under the connector be sure to check the serial port settings are correct.

After changing the config file restart the service with sudo systemctl restart ser2net

I can now telnet to my ser2net host of 192.168.26.3 and depending on the port I get connected to a different machine. As shown in the screenshot above I have four interfaces connected and could use a USB hub or multi-port serial interface to access more machines.

When you should use WPA3 transition mode

Wi-Fi is backwards compatible so, if you really want to, you can connect that old HTC TyTN running Windows CE from 2006 to the latest Wi-Fi6E AP. There are good reasons not to support some of the oldest parts of the Wi-Fi standard if you don’t need to, so we tend to trim the lowest data rates supported and may choose not to use 2.4GHz for some SSIDs, for example.

We generally want our Wi-Fi networks to be secure however, so it’s a good idea to avoid using deprecated security such as WEP. Wired Equivalent Privacy turned out to be nothing of the sort and, once broken, was trivial to bypass. It should never be used, nor should WPA TKIP, the gaffer-taped fix for WEP.

WPA2 has been king for some years now, in fact it’s really quite old and it has limitations. It isn’t considered completely broken like WEP or WPA, but it has issues (which I won’t go into here) and so we get WPA3 as the latest offering for authentication and encryption.

It may seem obvious to switch to this latest and most secure option but that relies on your infrastructure and all clients supporting it.

This is where it gets tricky… because clients have a bad habit of sticking around. I recently worked with a customer who’s industrial and warehousing equipment didn’t support WPA3 at all, despite the latest hardware version being released in 2021. Even if your client hardware can support WPA3, do drivers need updating before this works properly… probably. Has this been done? Probably not.

WPA3 comes with a transition mode that allows for WPA2 clients to connect to the network. However at this point you’re essentially running WPA2 and subject to its drawbacks, at least for any clients that can’t support WPA3. What’s more because these clients work just fine it’s harder to form a business case to replace them or push updates up someone’s list of priorities.

It’s for this reason WPA3 transition mode is probably not a great idea on many occasions.

That said, I’m about to deploy it… and here’s why I think it’s the least bad option:

Nobody knows what the clients will support. There’s no coherent list of what clients exist on the network at all, and no time to gather this information. We have to assume that some clients won’t support WPA3 either at all or not without action. The desire is to use WPA3 as soon as possible but any disruption to clients is also problematic.

By using transition mode clients that can support WPA3 will do. Those that cannot can be audited as connecting with WPA2 and updated or replaced. Once clients are all using WPA3, or at some arbitrary deadline by the security team, transition mode can be switched off. Most clients will not see this change as a new network, so the disruption to WPA3 clients will be minimal.

Under ideal circumstances a new network would be deployed without transition mode and clients would like it or lump it… however life doesn’t work that way, and we really do need to transition to WPA3.

Video doorbell

Not really a huge fan of these things, but after missing a few deliveries it’s really a must. So I’ve got one – a Lorex 2k QHD Wired Video Doorbell.

Don’t let that word “Wired” fool you, this is a Wi-Fi device. It takes power from an existing doorbell transformer and runs on 16-24V AC.

It’s part of the Lorex Fusion Collection so there’s a network NVR and a range of cameras that work alongside it. I chose this as much for what it isn’t… it isn’t a Ring. It also ought to be easy to install, comes with a chimekit for linking an existing mechanical doorbell chime, doesn’t look too bad, records locally onto SD card and you can stream the video from it with accessible RTSP feeds:

Main stream: rtsp://ip/cam/realmonitor?channel=1&subtype=0
Sub stream: rtsp://ip/cam/realmonitor?channel=1&subtype=1

Despite taking care to check the Wi-Fi performance in the installation location I made a major error and didn’t test with the door closed. It seems my front door presents significant attenuation as does seemingly every wall in my house. This seems to be a particular feature of many new build houses, with the foil backed insulation and plasterboard. I also suspect the Wi-Fi radio/antenna in the doorbell isn’t great.

One update, post this video being completed, is the notification issue. If notifications are disabled for the device you will still be notified if someone presses the doorbell. This solves the notification fatigue issue I referenced, it just isn’t at all clear in the app this is how it works.

Big, fat, bloaty channels

Dip your toes into the world of enterprise Wi-Fi and the manta is “only use 20MHz wide channels” yet this is not the default for most vendors, and then you might notice pretty much every ISP router supplied to domestic customers (at least in the UK) is using 80MHz channels…. so what gives and when are these big bloated wide channels a good idea?

Perhaps the first thing to understand is what this even means. We’re talking about the 5GHz band ranging from 5150MHz to 5850MHz. For Wi-Fi this is divided up into 20MHz channels, although not all of this spectrum is available in all countries. In the UK most enterprise Wi-Fi vendors offer 24 channels for indoor use. A 40MHz channel is simply two neighbouring 20MHz channels taped together. (more information can be found in Nigel Bowden’s whitepaper)

Wi-Fi speed depends on a lot of variables but chiefly it comes down to the Modulation & Coding Scheme (MCS), the number of spatial streams supported by the client and Access Point (two spatial streams is twice the speed of one, for example) and the channel width being used. A 40MHz channel has double the throughput capacity of a 20MHz channel (actually it’s ever so slightly more than double, but let’s keep it simple) and 80MHz can double that again.

Back to ISPs. BT currently recommend I take up their full fibre service offering 150Mbps download speed. I’m going to expect to see that when I run a speedtest from my iPhone. So what does that mean for the Wi-Fi?

The first thing to identify is that my client, the iPhone XS Max, supports Wi-Fi5 (802.11ac) with one spatial stream. So if we take a look at the MCS table (we’re interested in the VHT column) the fastest speed we can achieve is 86.7Mbps for a 20MHz channel. Importantly this is the raw link speed, various overheads mean you’re not going to see that from your speedtest application. What’s more this is the best we can do in ideal circumstances. If my Wi-Fi router is a room or two away it’s unlikely the link will reliably achieve that MCS Index of 8.

So why does the BT router use 80MHz channels when it looks like a 40MHz channel should let us reach our 150Mbps line rate?

Two reasons. Firstly BT sell services with a faster line rate of around 500Mbps and remember these highest speeds are in optimum conditions. So by using an 80MHz channel, we’ve got up to 433.3Mbps of Wi-Fi capacity for our single stream client which increases the chances of hitting a real world 150Mbps throughput around the house.

“So what?” you may ask. Well you don’t get something for nothing, there’s always a trade-off. Remember Wi-Fi only has a finite amount of channel capacity and we need to be deliberate in how that’s used.

For enterprise networks we’re typically less concerned with the maximum throughput a client can achieve versus the aggregate throughput of the whole network. Basically, it’s not about you it’s about us.

Creating good coverage for an office space means multiple access points. We ideally want each of those access points to be on a separate channel or at least to have APs on the same channel to be as far apart as possible. Because using wider channels limits how many you can have, we can reduce the effectiveness of channel reuse in larger networks. That means increased risk of interference between APs, resulting in collisions, lower SNR and ultimately lowering throughput.

This is why a large, busy network running on 80MHz channels can be expected to have lower aggregate throughput than with 40 or 20MHz channels.

There’s also the important matter of noise.

Noise is signal on our channel, picked up by the receiver, that isn’t useful signal we can decode. The key to achieving a high MCS value is a high Signal to Noise Ratio (SNR). For each doubling of the channel width (from 20, to 40, to 80) the noise level is doubled too.

Back to ISPs… again. My hypothetical BT router is running on the same UNI-1 80MHz channel as my neighbours either side. Which means there’s a very high chance of interference. So although BT have chosen this bloater of a channel to improve throughput, it could do the opposite. In most cases you get away with it because our houses provide sufficient attenuation, especially at 5GHz. But densely populated areas, flats for example, it can be the case that neighbouring Wi-Fi networks are really very strong.

Which, finally, brings me to where you can successfully use these wide channels: anywhere you’re not competing for channel space.

So for a small network install in an area that doesn’t have neighbouring networks it can work really well. I’ve tested using 80MHz channels with my home network, simply because I can. The house and my home office have foil backed insulation which does a good job of blocking Wi-Fi. What’s more the ISP supplied routers all tend to use UNii-1 channels – the first four of the band. I’m using Aruba enterprise APs so can select other channels that nobody is using nearby.

And so we reach some sort of conclusion which is, yes, 20MHz channels are still the right way to go for most enterprise deployments. You can use wider channels if you know you have the capacity for them and you’re not ruining your channel re-use plans. At home, if you’re not getting anywhere near the throughput you think you should, you might be suffering from everyone effectively using the same channel. But don’t forget to test with a few different devices, your phone is probably the worse case scenario.

Incrementing a ClearPass Endpoint attribute

This post is based on the SQL query found here. It’s clearly a fairly niche requirement but it’s come in very handy.

Let me set the scene… An open Wi-Fi network is provided for a major public event but is only there for accredited users, not the general public, authenticated with a captive portal. Some members of the public will no doubt try connecting to the network, reach the CP and find they can’t get anywhere.

The problem is every connection consumes resources. If enough people do this there could be DHCP exhaustion and issues with the association table filling up. Assuming everything is sized appropriately it’s likely to be the number of associations that are the primary concern.

There are various answers this configuration, most of which revolve around better security in the first place, but there are good reasons it’s done this way… let’s move on.

MAC caching is being used by ClearPass so the logic says: “do I know this client and if so is the associated user account valid? If so return the happy user role, if not return the portal role”.

This means there are no auth failures – we’re never sending a reject, ClearPass returns the appropriate role.

What we want to do is identify clients that don’t go through captive portal authentication, and therefore just keep being given the portal role.

I added an Endpoint attribute of “Counter” (Administration\Dictionary Attributes)

Next a custom filter is added to the Endpoints Repository. This query (courtesy of the wonderful Herman Robers) reads the counter attribute into a variable of “Counter”. It also reads the counter attribute and adds 1 for the variable “Counter1”.

SELECT attributes->>'Counter' as Counter, (attributes->>'Counter')::int +1 as Counter1 FROM tips_endpoints WHERE mac_address = LOWER('%{Connection:Client-Mac-Address-NoDelim}')

Add this as an attributes filter under Authentication\Sources\Endpoints Repository

Within a Dot1X or MAC-auth service you can then call the variable: %{Authorization:[Endpoints Repository]:Counter1}

An enforcement profile is created to update the endpoint with the contents of Counter1 and this is applied alongside the portal role.

The result is each time a client hits the portal we also increment the counter number. At a threshold, to be determined by the environment, we start sending a deny. In my testing I set this to something like 5 to prove it worked.

This works well but a persistent client can just keep trying to connect which can still consume some resource as the AP has to generate auth traffic.

In this case the network is using Aruba Instant APs which have a dynamic denylist function. This was set to block clients for one hour after 2 authentication failures.

What happens now is after a client has hit the portal 5 times, ClearPass sends a reject, the client almost immediately tries again and is rejected, at which point it’s added to the denylist and can no longer associate with the network.

There are risks to this approach – it’s easy to see you could end up with false positives being denylisted. Clearly a better overall solution would be to avoid deploying an open network but that opens a whole other can of worms when dealing with a very large number of BYOD users.

On-Prem is cheaper than cloud…

I came across this tweet that got a few people talking:

For a long time the rhetoric I heard at my previous employer was “The cloud is just someone else’s computer”… which is true of course but intrinsic to that comment is that if you have computers of your own why would you need to use someone elses.

That changed at some stage, as fashion does, and where once it was clearly far more sensible to continue to use our own, ‘on-prem’ DCs these suddenly became hugely expensive and the TCO of cloud looked a lot better.

So is on-prem cheaper than cloud? Well… yes and no… like so many things, it depends.

Most often you can spin the figures to suit the case you want to make. For example the cloud spend is all coming from the IT budget whereas the responsibility for something like aircon maintenance for the DC building might sit with the estates department. Costs can be moved around, included or excluded depending on the outcome you want – or maybe how honest you are…

Personally I think the true TCO of on-prem DC stuff ought to accurately reflect how much it costs the organisation rather than how much of it sits in one budget, but that’s just me and my simplistic view of how accounting ought to work.

Also, what’s the space worth and has its cost been written off? A dedicated, fully owned DC building as part of a university campus has a very different value, and therefore potential cost, to DC space within a building in a city. Basically what else could that space resource be used for and is it potentially worth much more filled with people rather than computers.

The size of an organisation makes a huge difference. One developer with a good idea can use AWS or Azure and throw together a level of infrastructure that would need at least 10s of thousands to achieve with tin.

However just as the organisations with ‘legacy’ on-prem DCs are looking at their maintenance & replacement budgets with a heavy heart, those startups that grew as cloud native might well be looking at their monthly cloud fees and sighing just as heavily.

I’m personally a big fan of the hybrid approach. Some workloads work brilliantly in the cloud, others less so…

What that tweet pushes back against is the idea cloud is cheaper because it just is. That patently isn’t true and many have been burned by just how high their CSP bills are.

AOS-Switch (2930) failing to download ClearPass CA certificate

tl;dr – Check the clocks, check you the well-known URL on ClearPass is reachable, check you’ve allowed HTTP access to ClearPass from the switch management subnet.

Another in my series of simple issues that have caught me out, yet don’t seem to have any google hits.

When you implement downloadable user roles from ClearPass with an Aruba switch the switch uses HTTPS to fetch the role passed in the RADIUS attribute.

There are a few things you need in place to make this all work but the overall config isn’t in scope for this post. The key thing I want to focus on, that caught me out recently, is how the switch validates the ClearPass HTTPS certificate.

With AOS-CX switches (e.g. 6300) the certificate can simply be pasted into the config using the following commands:
crypto pki ta-profile <name>
ta-certificate
<paste your cert here>

You don’t need the full trust chain either, if your HTTPS cert was issued by an intermediate CA you only need to provide that cert, though it doesn’t hurt to add the root CA as well.

With AOS-Switch OS based hardware (e.g. 2930f) you can’t paste the cert in, your CLI option is uploading it via TFTP.

Fortunately there’s a much easier way of doing this – an AOS-Switch will automatically download the CA cert from ClearPass using a well-known URL – specifically this one:
http://<clearpass-fqdn>/.well-known/aruba/clearpass/https-root.pem

You have to tell the switch your RADIUS server is ClearPass by adding “clearpass” to the host entry – but I did say I wasn’t going to get into the config.

Recently I had a site where this didn’t work. The switch helpfully logged:

CADownload: ST1-CMDR: Failed to download the certificate from <my clearpass FQDN> server

This leads to:

dca: ST1-CMDR: macAuth client <MAC> on port 1/8 assigned to initial role as downloading failed for user role

and:

ST1-CMDR: Failed to apply user role <rolename> to macAuth client <MAC> on port 1/8: user role is invalid

So what was wrong? In this case it was super simple. The route to ClearPass was via a firewall that wasn’t allowing HTTP access.

Other things to check are clocks – both the switch and ClearPass – always use NTP if you can. Also there have been ClearPass bugs introduced in some versions that break the well-known URL so its worth checking the URL is working. There can also be some confusion between RSA an ECC certificates, which ClearPass now supports. The switch will use RSA.