On my quest to learn this week I had the privilege to attend Peter Mackenzie’s Certified Wireless Analysis Professional class. When a colleague and I attended Peter’s CWNA class a couple of years ago he suggested that CWAP should the be next port of call after passing the CWNA exam. Initially I thought that was mainly because he wrote the book (and an excellent book it is too) but actually CWAP goes deeper into the protocol and builds an even better foundation for an understanding of how WiFi works.
Most people who’ve dabbled in networking are familiar with Wireshark. It’s a fantastic tool, and a great way of troubleshooting problems. With packet capture you can prove that client isn’t getting an IP address because it isn’t doing DHCP properly if at all, rather than it being a wider network issue…
Wired packet capture is usually easy. Mirror a port on a switch, put an actual honest to goodness old school hub in line (if you have one and can tolerate the lower bandwidth during capture), or if you have the resources get a fancy tap or dedicated capture device such as the Fluke Onetouch. Usually we have one of these methods available but for Wi-Fi it’s not quite so easy.
Mac users have these fantastic tools available, and there are good options for Linux users but for Windows folk life can be tough and expensive.
Wi-Fi drivers for Windows tend not to expose the necessary level of control to applications. So you’re left needing a wireless NIC with a specific chipset for which there’s a magic driver, or getting hold of an expensive dedicated capture NIC.
There is one option that I’ve played with in the form of Tarlogic’s Acrylic WiFi. This affordable software includes a ndis driver that interfaces with the Wi-Fi NIC and presents monitor mode data to applications. Analysis within Acrylic is fairly poor but it will save pcap files and it’s possible to use the Acrylic driver directly in Wireshark.
The problem is that many new drivers don’t interface with ndis in Windows as things used to so as a result there’s a shrinking number of available Wi-Fi NICs that still work.
Some time ago I bought an Asus AC53 USB NIC which is on the Acrylic supported list and it is possible to install the old windows8.1 drivers on windows 10. However this doesn’t support DFS channels, which is a problem because we use DFS channels.
Fear not though it is, just about, possible to make this work. The Netgear A6200 uses the same Broadcom chipset and supports DFS channels. Once installed I was able to select the netgear driver for the Asus device and sure enough it works.
Which is a long lead in to this little tidbit, a key take away from Peter’s course this week.
When looking at a wireless capture it’s important to remember you might not be seeing all the information. Physical headers are stripped off by the hardware of the Wi-Fi interface, so you can’t see those. Wi-Fi does certain things with physical headers only, such as Mu-Mimo channel sounding and aspects of this are therefore not visible to a protocol analyser.
It probably goes without saying that you can’t see encrypted data, but you can usually see that it’s been transmitted… Unless your wireless interface can’t decode it.
Let’s say, for example, your AP is using a 40MHz DFS channel and the capture setup you’re using can’t be configured to use 40MHz channels. In this scenario, because management and action frames are all transmitted on the primary 20MHz channel you can see these just fine, yet all the higher rate data frames that take advantage of the full 40MHz just disappear.
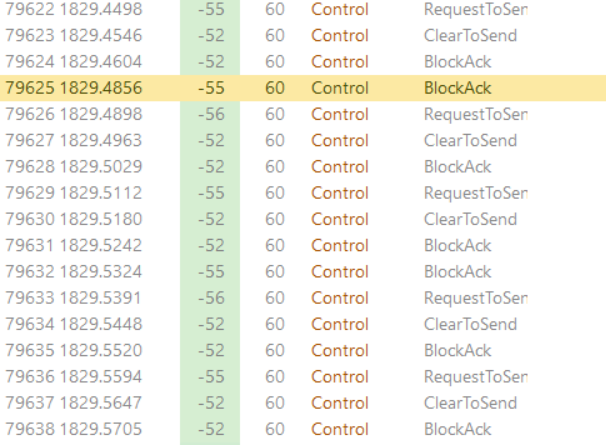 The result looks a bit like the picture here… A client sends RTS, the AP responds CTS and the next thing is a block acknowledgement but no data.
It’s sometimes possible to see the data transfer betrayed in the time between the packets but here, because the data rate is high and the traffic is light, it’s not particularly apparent.
I’m particularly looking forward to spending more time digging into protocol analysis and hopefully getting some better tools.