IPSec over fortinet site to site vpn

Here’s a little gem found by a colleague.

A customer has Aruba AOS 8 Gateways communicating with the Mobility Conductor via a fortinet site to site VPN.

The Fortigate units were upgraded and the IPsec traffic from the Gateways to the Mobility Conductor was being dropped. Nobody noticed for a month until the Gateways stopped working because the licenses couldn’t be validated.

My colleague was able to prove the traffic was getting to the Fortigate and was passing through the rules but didn’t arrive at the other end of the tunnel. This smelled to me like an ASIC or acceleration issue, and that’s exactly what it was.

Lots of head scratching later… the issue was solved with npu-offload disable.

The new Fortigates had this acceleration function enabled by default and, it turns out, you can’t pass the Aruba IPSec traffic across the IPSec site to site VPN with npu offload enabled. It might be possible to make this work by changing the IPSec parameters, although I’m not even sure it that’s possible.

As it is, this customer doesn’t need to accelerated performance, they just wanted it to work.

Congrats to Colin Irwin who figured this out.
Fun and games with RadSec

Most of the time we’re using RADIUS over a private management network and don’t really care too much about security, but that changes when you put your authentication server in AWS or Azure and send authentication traffic over public internet. RADIUS is not secure and uses an MD5 hash for encryption that doesn’t meet modern standards. This is where RadSec comes in.

RadSec is effectively RADIUS over TLS with client and server certificates used to authenticate and encrypt the traffic. RadSec uses mutual authentication – at the setup of the tunnel both the client and the server need to successfully authenticate each other for everything to work. Worth noting RadSec only uses a single port – TCP:2083 – rather than separate ports for authentication, accounting and change of authorization (dynamic RADIUS).

To lab this I have ClearPass running in Azure. The authenticator is an AP on a private network, connecting to public internet via a NAT gateway and managed by Aruba Central.

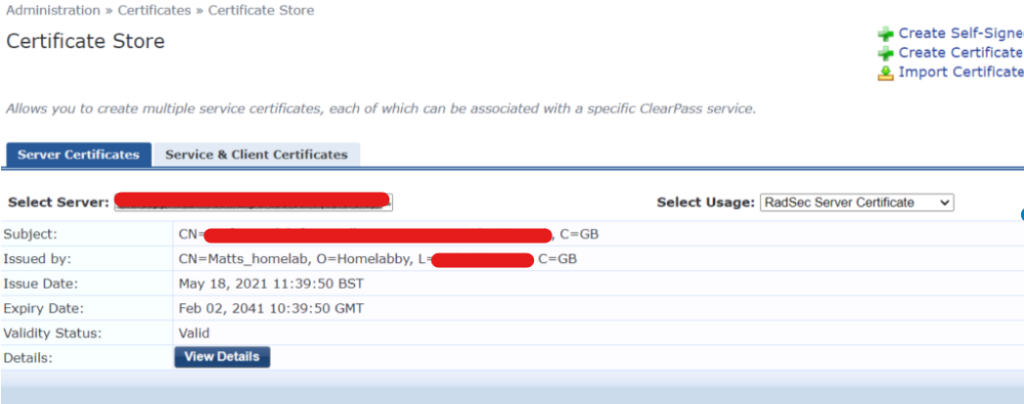
For the server side this certificate authentication is probably familiar territory. You add a server certificate, signed by a CA the client will recognise, and that’s about it. You may of course need to add the CA root to your client’s certificate store. Here’s my RadSec certificate in ClearPass, signed by a private CA.

The network access device entry has the actual private IP address of the AP so I can identify it more easily but ClearPass will see an incoming connection from the NAT public IP. I’ve entered this into override IP under RadSec settings so ClearPass will accept the connection. I can also add certificate validation checks. This lets you separate multiple authenticators behind a single NAT IP. For example if you have both switches and APs on a site and need to handle these differently, placing them in different NAD groups or applying varying attributes. In this case I’m not performing any authorization checks.

Because it’s a private CA I’ve uploaded the root certificate that signed the server certificate (labca_root) into Central and applied this on the group security settings. The CA root is needed for the APs to authenticate the server. I’ve also uploaded a client certificate (radsec_client_san) that the APs use when contacting the server. The same CA was used for this so the root certificate has also been added to the ClearPass certificate trust list.

The way Aruba Central handles things, these certificates are used by all devices in that group. So all my APs will use the same client certificate. Best practice with Aruba Instant is to proxy RADIUS traffic via the Virtual Controller. This changes in AOS10, but it’s likely a single certificate used to authenticate all devices within a group is just fine. You can assign certificates per device using template groups but you’d really need a very good reason to want to do that. Don’t make this more complicated than it needs to be.

That’s where most of the documentation ends. But it didn’t work.

The one place I got stuck for an embarrassingly long time was getting the client certificate to work. I’m no expert on working with OpenSSL but to save you my pain, here’s what I eventually realised.

All certs, server and client, should have a subject alternate name with the IP address. This means things still work if the client can’t resolve the DNS name of the server, and it’s essential for the client certificate to have the IP address from which the client will connect included, so in this case it’s the NAT public IP. You can include multiple IPs for a certificate that’s being used across various sites. I don’t believe there’s a viable solution for not having static addressing. Dynamic DNS won’t help you here.

The client certificate needs to be just that, a client cert. Specifically it needs the X509v3 extended key usage variable of: TLS Web Server Authentication. In this output from OpenSSL you can also see the Subject Alternative Name appears where, trust me, the IPs are listed.

If you don’t have either the IP address your authenticator is connecting from in the certificate, either as the CN or in the SAN, or the TLS Web Server Authentication extension it won’t work and you’ll get unhelpful errors on the AP such as:

radsec_read_from_tls_socket:311: some error(6) encountered while reading

If, like me, you’re using ClearPass and, unlike me, have an Onboard CA you can generate the client certificate there. For my purposes I’m using OpenSSL to do this. There lots of tutorials in how to use it, but here’s what I did.

Create a config file with the necessary settings, which I saved as san.cnf

[req]
distinguished_name = req_distinguished_name
req_extensions = v3_req
prompt = no
[req_distinguished_name]
C = GB
ST = The Shire
L = York
O = Homelab Inc
OU = IT
CN = aps.homelab.home
[v3_req]
extendedKeyUsage = serverAuth, clientAuth, codeSigning, emailProtection
basicConstraints = CA:FALSE
keyUsage = nonRepudiation, digitalSignature, keyEncipherment
subjectAltName = @alt_names
[alt_names]
DNS.1 = <ip1>
DNS.2 = <ip2>

Generating the CSR: openssl req -nodes -newkey rsa:2048 -keyout radsec_client.key -out radsec_client.csr -config san.cnf

Making the certificate – for this I’d already created my private CA root, which is what’s referenced as the root.pem and root.key: openssl x509 -req -in radsec_client.csr -CA root.pem -CAkey root.key -CAcreateserial -out radsec_client.crt -days 7200 -sha256 -extensions v3_req -extfile san.cnf

In order to import the client cert it often needs to be in pkcs12 format: openssl pkcs12 -export -out radsec_client.pfx -inkey radsec_client.key -in radsec_client.crt

There’s no requirement for the client and server certificates to use the same CA, in this case it allows easy rolling of certs that are valid for a long time, which is beneficial for this use case. Using OpenSSL for a simple private CA is really, easy, here’s a good run through.

As I said before, getting all this to work took an embarrassingly long time. In my defence this is mainly because when things don’t work there’s very little useful information logged, hence this post which may be useful to someone, not least me when I need to do this again in a few years.

One final thought on this. Certificates get forgotten and expire causing merry hell with infrastructure when they do. In this deployment, using ClearPass and Central managed APs it’s trivially easy to update the certificate so if you have to use a CA that doesn’t let you create long expiry dates that’s probably not the end of the world. However be sure to set a diary reminder so that work can be scheduled. It’s quick and easy to do but it’s still potentially disruptive.

As certificate expiry terms get ever shorter, there remain areas where mutual authentication is valuable but changing things, even by automation, is undesirable. I’d still advocate using a nice long expiry date for certificates internal to infrastructure. I admit the 20 year cert life span of my lab CA is, perhaps, a bit extreme

The wall of RF doom

Here’s a video post about an interesting building construction that, probably, few will encounter so I thought it might be interesting. Also the perils of making assumptions about building construction when working on Wi-Fi designs.

My CWNE essays

Recently my friend and former 😢colleague Mac_wifi has called on others in the community to publish their CWNE application essays as a resource, benchmark, encouragement to others seeking to achieve the CWNE certification. I think this is a good idea. Nobody had asked me to write an essay in over 20 years and I wasn’t quite sure where to start. Hopefully a few of the current crop of CWNEs sharing their submission will help guide others.

Here’s a link to that blog post

I agree with the CWNP’s approach to their expert level. If you’re used to sitting multiple choice exams through Pearson Vue for your IT certs the need for an essay might seem a bit strange. Indeed many certification streams award the expert level automatically once enough exams have been passed. There’s nothing wrong with that approach but CWNP chose to take a different route for a good reason.

To become a CWNE, in addition to passing the exams, you need at least five years experience working in enterprise wireless networking, have people prepared to endorse you and write three essays to demonstrate that knowledge and experience.

What that means is a CWNE knows their stuff, has walked the walk and … well you know how the rest of that goes. It means a CWNE has experience that goes beyond the theoretical knowledge one can gather by studying for certification.

Some advice I’d offer anyone aiming for CWNE certification is to gather real world examples of solutions delivered and problems solved for your essays. In the rushing around of daily life it’s easy to fix a problem, move on to the next thing and then forget about the details. It’s also worth remembering your essays don’t need to be a technical tour de force of excellence, proving your capabilities as a Wi-Fi super human. We all know the real world is full of compromises. Name them and explain them. I consider an essay that knowingly describes a flawed implementation speaks more of experience than a textbook “perfect” network design, for example.

So those essays…

Essay 1 – Design
Essay 2 – Security
Essay 3 – Analysis

I’m always happy to talk further with anyone about this, if you want to get in touch you can reach out to me on twitter