Ekahau Connect

One of the tools that’s made the most difference to my work with WiFi has to be Ekahau Site Survey (now known as Ekahau Pro) and it’s now better than ever. I’m just going to go straight for the exciting part. Ekahau Connect lets you plug your Ekahau Sidekick into your iPad for surveying and, yes, that is as lightweight and functionally glorious as it sounds. But there’s more…

Ekahau have turned what was one application, Ekahau Site Survey, into a suite that form Ekahau Connect. There’s Ekahau Pro – the Windows/Mac application that many WiFi professionals know and love. Ekahau Capture – Packet capture utility for the Sidekick. Ekahau Cloud – a cloud sync service, and Ekahau Survey – an iPad app used for surveying with the Sidekick.

To get the advantage of all this new goodness it’s pretty clear that you need a Sidekick. I found the Sidekick to be a worthwhile investment from the get go, but now I can connect my Sidekick to my iPad, it’s become something of a must have.

For surveying, for me, it’s transformative. The Sidekick with an iPad combination is lightweight with long battery life and much easier to operate on the move. Pan and zoom around the floor plan is so much smoother and easier on the iPad, and that really matters when you’re on your feet and also having to negotiate obstacles in your path.

I’ve been using ESS for the last few years and have always struggled to come up with a really satisfactory workflow for surveys. In part that’s because I’m often dealing with small academic offices (the offices are small, not the academics) which are not always easy to move around, and the doors all have aggressive auto-closers that try to eat my laptop. In short, I’m usually fighting piles of paper, books and doors, all while ensuring I’m being accurate with my location clicking on the floor plan. Even the lightest weight laptop starts to feel heavy after a while. I’ve been using a Lenovo Yoga, for the fold over touchscreen design and whilst it’s easier to carry around, it’s actually fairly hard work to operate because Windows and touch have never really gelled.

On the iPad it’s a different story. For a little while I’ve been playing with the beta of Ekahau Survey as the team beat back the rough edges (there really weren’t very many) and took on board feedback from everyone giving it a spin.

Using an iPad I can survey more quickly, make fewer errors that I need to correct, and keep going for longer. It’s a real productivity boost.

The workflow is pretty straight forward. Create your project in Ekahau Pro then export the project either to Ekahau Cloud or to the internal storage of your Sidekick. The latter option being particularly useful if surveying for a site where you don’t have internet access for your own device. The Ekahau team have talked a lot about how they ensure data isn’t lost if there’s a crash or the battery dies, by saving data to the iPad, the cloud service and the Sidekick.

From the moment I got my Sidekick I’ve wondered how long it would be before there was a packet capture utility… and now it’s here. I didn’t have advance information, it was just an obvious use case. Wireless packet capture under Windows has always been a slightly tricky task, Ekahau Capture and Sidekick make it really easy and the dual radios mean you can get complete (non-scanning) captures on two channels at the same time.

I’ve briefly mentioned Ekahau Cloud, but it’s worth exploring a little bit because it makes sharing projects easy. This is a big help for teams. It also means it’s possible for a team to work on different floors of the same building, and sync all that data back to the same cloud project.

I don’t want to neglect Ekahau Pro in this big update as it’s had more than just a new name. Quite a lot has changed under the hood. The visualisations are improved and I believe there’s also been some work done on improving the prediction algorithms.

Bottom line is if you’re already using Ekahau tools, especially if you already have a Sidekick, you’ll want to spring for this new suite so it’s worth putting together a case for management or your accountant to consider.
Where’s the data?

On my quest to learn this week I had the privilege to attend Peter Mackenzie’s Certified Wireless Analysis Professional class. When a colleague and I attended Peter’s CWNA class a couple of years ago he suggested that CWAP should the be next port of call after passing the CWNA exam. Initially I thought that was mainly because he wrote the book (and an excellent book it is too) but actually CWAP goes deeper into the protocol and builds an even better foundation for an understanding of how WiFi works.

Most people who’ve dabbled in networking are familiar with Wireshark. It’s a fantastic tool, and a great way of troubleshooting problems. With packet capture you can prove that client isn’t getting an IP address because it isn’t doing DHCP properly if at all, rather than it being a wider network issue…

Wired packet capture is usually easy. Mirror a port on a switch, put an actual honest to goodness old school hub in line (if you have one and can tolerate the lower bandwidth during capture), or if you have the resources get a fancy tap or dedicated capture device such as the Fluke Onetouch. Usually we have one of these methods available but for Wi-Fi it’s not quite so easy.

Mac users have these fantastic tools available, and there are good options for Linux users but for Windows folk life can be tough and expensive.

Wi-Fi drivers for Windows tend not to expose the necessary level of control to applications. So you’re left needing a wireless NIC with a specific chipset for which there’s a magic driver, or getting hold of an expensive dedicated capture NIC.

There is one option that I’ve played with in the form of Tarlogic’s Acrylic WiFi. This affordable software includes a ndis driver that interfaces with the Wi-Fi NIC and presents monitor mode data to applications. Analysis within Acrylic is fairly poor but it will save pcap files and it’s possible to use the Acrylic driver directly in Wireshark.

The problem is that many new drivers don’t interface with ndis in Windows as things used to so as a result there’s a shrinking number of available Wi-Fi NICs that still work.

Some time ago I bought an Asus AC53 USB NIC which is on the Acrylic supported list and it is possible to install the old windows8.1 drivers on windows 10. However this doesn’t support DFS channels, which is a problem because we use DFS channels.

Fear not though it is, just about, possible to make this work. The Netgear A6200 uses the same Broadcom chipset and supports DFS channels. Once installed I was able to select the netgear driver for the Asus device and sure enough it works.

Which is a long lead in to this little tidbit, a key take away from Peter’s course this week.

When looking at a wireless capture it’s important to remember you might not be seeing all the information. Physical headers are stripped off by the hardware of the Wi-Fi interface, so you can’t see those. Wi-Fi does certain things with physical headers only, such as Mu-Mimo channel sounding and aspects of this are therefore not visible to a protocol analyser.

It probably goes without saying that you can’t see encrypted data, but you can usually see that it’s been transmitted… Unless your wireless interface can’t decode it.

Let’s say, for example, your AP is using a 40MHz DFS channel and the capture setup you’re using can’t be configured to use 40MHz channels. In this scenario, because management and action frames are all transmitted on the primary 20MHz channel you can see these just fine, yet all the higher rate data frames that take advantage of the full 40MHz just disappear.

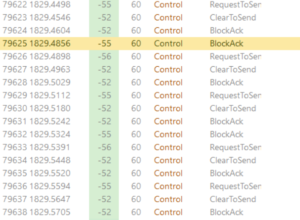
The result looks a bit like the picture here… A client sends RTS, the AP responds CTS and the next thing is a block acknowledgement but no data.

It’s sometimes possible to see the data transfer betrayed in the time between the packets but here, because the data rate is high and the traffic is light, it’s not particularly apparent.

I’m particularly looking forward to spending more time digging into protocol analysis and hopefully getting some better tools.

Taming Aruba ARM

About 18 months ago a new building was completed on our campus. During the post install Wi-Fi survey I noticed that pretty much all the APs were using the same 5GHz channel, despite being configured for our standard radio management profile. In fact the only thing Aruba ARM appeared to have done was reduce the power of most APs to the minimum specified. So what was going wrong?

Depending on who you listen to using the automatic radio management tool in your enterprise Wi-Fi setup is either eminently sensible or complete madness. Feelings run high when it comes to radio config it seems. Whether you ultimately decide to use it or not, it’s worth understanding what it does, how it does it, and how it really behaves outside of the ideal deployment.

Your Wi-Fi vendor sales guy will promise the world; they’ll tell you their solution is the best (of course) and that it will solve any RF issues, even removing the need for costly install surveys and design because the magic radio management will just sort it all out.

This is, of course, not true.

The first thing to you should be very clear about is that no RF management will fix a fundamentally bad design. So what does it do for you?

I have the most experience with Aruba’s Adaptive Radio Management, or ARM for short. ARM has grown gradually more sophisticated over the years as ArubaOS has developed. Essentially what ARM does is attempt to stop your access points from interfering with each other, reducing co-channel interference (APs on the same channel within range of each other). ARM will change the channels used by your APs and adjust power levels. It can also disable 2.4GHz radios where it deems necessary. The latest version announced can even change channel widths, allowing you to maximise performance by switching to 40MHz channels automatically where there is sufficient channel space.

In an environment with a controller and ‘lightweight’ APs you can be forgiven for thinking the controller gathers all the information about which APs can see each other and then creates a perfect channel plan. In reality Aruba campus APs are far less lightweight than you might imagine. Most of the management traffic and RF decisions, such as radar detection, channel selection and how ARM behaves all takes place on the AP with the controller notified what channel the AP has done.

This means automatic channel selection is an iterative process. In a large building with a lot of APs it can take ARM a long time to settle down as APs move channel to avoid a neighbour, but then interfere with a different neighbour. You have all your APs moving around the available channels, trying to keep out of each other’s way. In a large deployment I reckon on this process taking about 24 hours.

So what was going on in that new building?

The settings we were running for ARM were mostly default and these are fairly conservative. APs moving channel can cause a poor user experience, so you don’t want your APs to be jumping around all the time. By default ARM won’t move channel if there’s a client associated with the radio. You can control this behaviour by disabling Client Aware and control how aggressive ARM is by adjusting the Coverage Index and Backoff Time.

By creating an “aggressive” ARM profile and applying this to the new building AP group I found ARM then worked as expected, changing channels in order to minimise channel overlap. Good job ARM. Once the iterative process had been left running for 24 hours, we reverted to our regular ARM profile and all has looked pretty good since.

Because the 2.4GHz band has few non-overlapping channels, if you install dual band APs you’ll probably want to disable the 2.4GHz radio on quite a few APs. ARM will do this for you with a function called Mode-Aware. I can’t recommend using this. The problem is that ARM doesn’t have a high level view of… anything. Remember it’s just each AP knowing what it can ‘see’ around it. So ARM doesn’t understand the layout of the building and what areas each AP are providing coverage for.

On every occasion mode-aware has been turned on, we’ve had problems. ARM has disabled 2.4GHz radios on the wrong APs, usually those closest to the majority of users. Once after a system upgrade we had complaints that previously functioning Wi-Fi was now very poor. ARM had moved which APs had the 2.4GHz radio switched off. This is a function that might improve in the future but right now when it comes to disabling radios I reckon I can do a better job myself.

There can be similar issues with changing power levels. I’ve limited the range ARM can use to adjust power. It can reduce power by about 6dB, which is quite enough.

I mentioned that ARM won’t fix a bad design. Take an example (now fixed) of an accommodation block with APs in corridors, mounted at the same point on each floor, so vertically above each other. Pretty much every AP could see every other AP. 2.4GHz was a disaster and all ARM could do was turn down the power, which it did, to the absolute minimum. That didn’t help the channel overlap, but it did mean there was no longer coverage into many of the bedrooms turning a bad Wi-Fi experience into no Wi-Fi experience at all. It turned out 5GHz wasn’t much better because there were always clients around, so several APs were stuck on the same 5GHz channel.

None of this is ARM’s fault, but as we worked to fix the problems experienced by users, the first thing we did was disable most of the ARM features because their attempts to fix the poor RF design just made things worse.

So why bother with ARM at all? Firstly there has been no appetite to manually build static channel plans for more than 2000 APs. Aruba’s config leans towards an assumption you’ll be using ARM. The administrative overhead of the necessary profiles for all the various channel options would be an unpleasant thing to deal with. Perhaps most importantly, since making some fairly small changes to ARM, and better understanding what it can do for us, it’s now a useful tool that makes running the network easier and more predictable.